
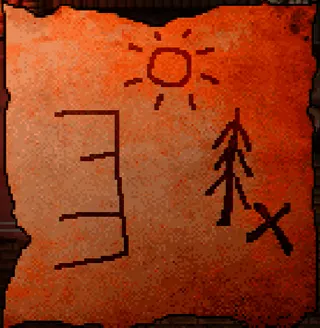
Buy the Shovel from the General Store, keep the numbered Treasure Map in inventory, travel to its landmark, and interact with the exact ground tile. The shovel's captured description says buried treasure is found by interacting with the correct tile; swinging or using it on every nearby square is not a substitute for owning the clue and reaching the right spot.
Confirmed solutions are available for Maps 1–8, 11, and 12. Captured data lists Maps 9 and 10 as Fishing Treasure Loot but leaves their dig locations and rewards blank. This guide preserves those gaps rather than inventing two answers.
Prepare before following a treasure map
| Requirement | Check |
|---|---|
| Shovel | Purchase from the General Store; captured price is 50g |
| Correct map | Read the numbered item with “Use” before traveling |
| Area access | Obtain the named key or task unlock for Sewers, Mall back offices, or locked rooms |
| Inventory room | Leave space for several reward stacks |
| Save | Preserve one before testing a difficult or key-gated dig |
The Shovel is a general tool, not a consumable key in the captured item data. The interaction happens on the correct tile. If the tile does nothing, diagnose the map, landmark, access state, and interaction position before buying another shovel.
Use the world map guide for region navigation. World map and Treasure Map are different intents: one gets you to the Mall or Sewers; the other identifies a hidden tile inside that region.
Treasure Map 1 at the Mall parking lot
How to get it: Talk to the cat in the Farmhouse.
Dig location: Mall parking lot, next to the big tree between the parking lot and the entrance.
Recorded loot: 1 Cleansing Balm, 2 Bait Pack (Tier 1), 5 Coal, and 2 Spoiled Rations.
Stand near the large tree on the transition between the lot and Mall entrance, then test the ground tile beside it. Do not search inside the Mall. If the interaction fails, open Map 1 again and confirm the cat's conversation actually placed it in inventory.
Treasure Map 2 in the Sewers
How to get it: Loan Ellie money while shopping in the General Store.
Dig location: In the Sewers, to the right of the God Shrine behind a Gatekeeper door, below the drain.
Recorded loot: 2 Cursed Die, 1 Lucky Die, and 1 Crimson Die.
This solution has an access dependency. Reaching the Sewers does not prove the shrine-side room is open. Follow the Gatekeeper route and use the correct named Gate Key. The Gatekeeper second-key guide covers that progression.
Use “right of the shrine” only after entering the described room. Direction from another sewer entrance can be misleading. The drain and shrine are the stronger anchors.
Treasure Map 3 at the Ranch
How to get it: Talk to Alice.
Dig location: At the Ranch, under the streetlamp light next to Klaus's house.
Recorded loot: Recipe: Special Hotdog, 3 Bait Pack (Tier 1), 5 Wood, 3 String, 5 Stone, and 1 Iron Bar.
Travel to the Ranch rather than Alice's house or the Farmhouse. Find Klaus's house and use the streetlamp's lit ground as the final clue. Because the reward contains six stacks, clear inventory space first.
The map source does not specify one friendship threshold or time for Alice's conversation. If the map is not offered, check her current dialogue, task state, and alternate location rather than assuming the dig can be completed without the item.
Treasure Map 4 at the Lakefront
How to get it: Random reward from the pentagram mystery in the Parks and Recreation office.
Dig location: At the Lakefront, immediately right of the tree beside the picnic table and above the life buoy.
Recorded loot: 1 Aged Rum, 2 Small Coin Pouch, 1 Medium Coin Pouch, 3 Spoiled Rations, and 1 Stealth Musk.
Map 4's acquisition is recorded as RNG. Repeating the relevant mystery may not award it immediately. Do not treat one failed roll as a broken map. Luck influences Mystery die rolls, but no reliable drop percentage or guaranteed Luck threshold is captured.
At the Lakefront, use three anchors together: picnic table, adjacent tree, and life buoy below. The target is immediately to the tree's right.
Treasure Map 5 in the Mall back offices
How to get it: Random tier-one book loot in the Mall Mines.
Dig location: Mall Back Offices, at the Stalktopus Pond, just below the clock across the fishing pond.
Recorded loot: 1 Aged Rum, 1 Small Coin Pouch, Fickle Potions of Greed, Panic, and Daring, 5 Gold Ore, and 1 Mystery Sandwich.
Map 5 is another RNG acquisition and its dig site lies behind Mall progression. Adrian gives the Mall F1 Hallway Key when Tentacle Cleanup begins. Use the Adrian quest route if the food-court back-office door remains locked.
Inside, anchor on Stalktopus Pond and the clock across the water. “Below the clock” refers to the dig tile relative to that room, not to an outside Town clock.
Treasure Map 6 beside the Mall Mines
How to get it: Talk to Molly in her Workshop.
Dig location: Inside the Mall, left of the Mines, beside the blue garbage can.
Recorded loot: 3 Assorted Gems, 2 Treasure Casket, 1 Gem Bag, and 1 Blood Potion.
Molly follows a schedule, so the conversation may require finding her in the Workshop at another time. The Molly quest guide lists Workshop, Library, Task Board, General Store, Saloon, and night-time checks.
At the Mall, identify the Mines entrance first, then move left to the blue garbage can. Do not confuse this with a random garbage container on another floor.
Treasure Map 7 by the northwest water tower
How to get it: Talk to Celeste.
Dig location: Northwest Town, north of the Church, beside the large tree near the water tower with an eye symbol. The treasure is on the right of the large tree.
Recorded loot: 1 Large Coin Box, 1 Treasure Casket, 1 Gem Bag, and 1 Love Potion.
Use the Church to establish the district, then locate the eye-marked water tower and big tree. The final position is on the tree's right. This map demonstrates why landmark order matters: searching every large tree in Town is unnecessary.
Celeste is usually associated with the Library and can appear in Greystone or school-related routes. Confirm the map entered inventory before going north of the Church.
Treasure Map 8 below the park seesaw
How to get it: Gossip with Blorph.
Dig location: In the Park, below the seesaw.
Recorded loot: 2 Gem Bag, 1 Rare Gem Bag, and 1 Clear Gem.
Find Blorph in the Sewers behind the Police Station and complete the relevant gossip dialogue. The resulting dig is back in the Town park, not in the Sewers.
At the park, identify the seesaw and interact with the ground tile directly below it. Do not confuse Map 8 with Abby's Shopper-Bopper or the Egg Hunt, even though all use the park area.
Treasure Maps 9 and 10 remain unresolved
How to get them: Both are listed as Fishing Treasure Loot.
Dig locations: Not present in the captured treasure table.
Recorded loot: Not present in the captured treasure table.
Do not fill these rows from a thumbnail, a video title, or another map number. If a current save obtains Map 9 or 10, capture the full clue image, item description, successful tile, reward log, and game build. Until that evidence exists, “Fishing Treasure Loot” is the only dependable acquisition fact.
Fishing treasure is not the same as catching a normal fish. The fishing tutorial explains rod and minigame basics, but it does not guarantee either map on a fixed catch count.
Treasure Map 11 in the Mall Music Store
How to get it: Talk to Alice while she is at the Farmhouse.
Dig location: Mall Music Store, in front of the three brown guitars on the back wall.
Recorded loot: 1 Gem Bag, 2 Treasure Casket, 1 Love Potion, 2 Spiced Sausage, and 1 Cured Mana Steak.
Map 11 needs a specific Alice encounter location, unlike Map 3's general “talk to Alice” record. If ordinary Town dialogue does not award it, wait for or trigger the Farmhouse visit instead of repeatedly using the same home conversation.
In the Music Store, find the three brown guitars at the back wall and interact with the floor in front of them. The target is indoors; searching behind the Mall parking lot is a Map 1 mistake.
Treasure Map 12 behind the Slimy Key door
How to get it: Talk to Josh in the Art Gallery.
Dig location: In the Sewers beside Greystone Estates, behind the locked door requiring the Slimy Key.
Recorded loot: 2 Rare Gem Bag and 2 Cured Mana Steak.
The Art Gallery conversation and Slimy Key access are separate requirements. Getting the map does not create the key. Reach the Sewer segment next to Greystone, read the door prompt, and obtain the Slimy Key through its actual progression before testing the tile.
Do not use a Basic Skeleton Key on a door that names the Slimy Key. The Skeleton Key guide explains why matching the prompt matters.
Confirm the correct dig tile
Once at the landmark, use a controlled pattern:
- Open the numbered map and compare its drawing with the screen.
- Stand at the most specific anchor: clock, seesaw, garbage can, streetlamp, or guitars.
- Face or step onto the described adjacent tile.
- Use the normal interaction with the Shovel available.
- Check the reward log and inventory.
- Move one tile at a time only if the first position fails.
Do not sweep a large area randomly. A one-tile error is easier to diagnose when the starting anchor is known. If the landmark matches but no tile works, verify the map number and access state.
Check area prerequisites before digging
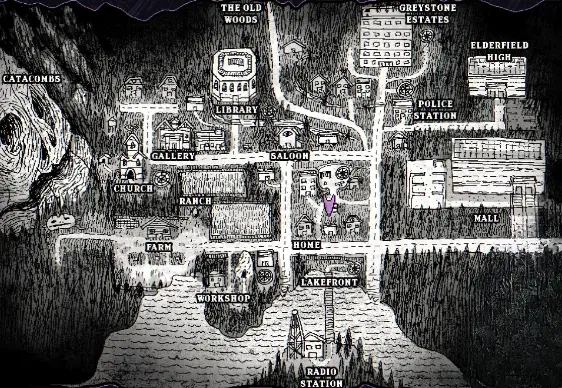
Several maps point behind normal progression:
- Map 2 requires the Gatekeeper-side Sewer room.
- Map 5 requires Mall Back Office access.
- Map 12 requires the Slimy Key door.
- Some NPC acquisition conversations depend on location or schedule.
The Shovel does not bypass those gates. Obtain the real key or task unlock first. Likewise, having area access does not replace the numbered map; keep the item until the treasure is collected.
Follower rooms from the Old Gods guide and ordinary treasure rooms are different systems. Do not use a cult room location as a numbered map solution unless the clue explicitly points there.
Verify loot without overwriting the evidence gap
Compare inventory stacks before and after digging. Maps 1, 3, 4, 5, 6, 7, 8, 11, and 12 award several different stacks. A full inventory can make it difficult to see what was received.
The source table may contain spelling or version errors. If one quantity differs, record the current result instead of repeating the dig or editing the table from memory. Treasure Map 9 and 10 should remain blank until a successful current-build dig provides direct evidence.
Fix a treasure dig that does not work
| Symptom | Check first | Safe response |
|---|---|---|
| No dig interaction | Shovel owned and correct tile | Put the Shovel in inventory and use the landmark pattern |
| Landmark is inaccessible | Named key or task gate | Complete the real prerequisite |
| Correct-looking tile is empty | Map number and clue image | Reopen the item and compare one adjacent tile at a time |
| NPC does not give the map | Required encounter location, schedule, dialogue | Meet the character in the recorded place |
| Fishing does not drop Map 9/10 | RNG and treasure-loot category | Continue only if the current fishing route can yield treasure |
| Reward seems incomplete | Inventory space and pre/post stack counts | Reload preserved save and document one controlled dig |
| Online answer points elsewhere | Version and map number | Trust the current clue and successful live interaction |
The dependable workflow is map first, area access second, landmark third, exact tile fourth, loot verification last. That order solves every confirmed numbered route on this page while keeping Maps 9 and 10 honestly unresolved.
Track collected maps without discarding the clue
Create a twelve-row note with four states: acquired, area open, treasure dug, rewards verified. Keep the map item until all four are complete unless the game removes it automatically. A map acquired from an NPC can remain unsolved for many days while the relevant key or district is still locked.
Do not infer a missing number means the previous treasure must be dug first. The recorded acquisition routes are independent: conversations, mysteries, book loot, fishing treasure, and location-specific encounters. Fill the ledger in the order the save provides them.
For Maps 9 and 10, attach the clue screenshot to the empty row and leave location and loot blank. Once a successful dig is found, record the region, anchor, adjacent tile, pre/post inventory, and build. That standard prevents two similar fishing maps from being swapped and turns an unresolved search result into reproducible evidence.
Editorial verification
This guide was source-checked on . Confirmed game details, community observations, older-build behavior, and unresolved evidence gaps are identified in the article instead of being presented as equally certain.
Found an outdated step or a version mismatch? Send a correction to Kevin.