
The Stone Tower begins at the large sealed door near your farm. Examine the door, then visit Prof. Dayton in the Library. He explains why growing crops and raising animals on your farm can weaken the seal. Return to the door to inspect its markings as you make progress; a normal key is not the solution to this first barrier.
The tower is a long main progression task that eventually leads toward the final challenge. Its opening door, crop offerings, later passages, and giant keyhole are separate stages. If you have already entered, use the section matching your current journal objective instead of repeating the instructions for the outside seal.
Start the Stone Tower task at the farm
Examine the large door even if you have already noticed the tower while exploring. The early task begins with that investigation: the door will not move, and its deep notches resemble a counter. A cultist associated with the dream is nearby, but the person who explains the structure is in town. Head to the Library and find Prof. Dayton in his study. The front desk directs you east to the study; Dayton is involved with the Elderfield Historical Society.
The journal initially asks you to find someone who knows about the tower. This is a conversation objective, not an instruction to gather a particular metal or search ordinary locked rooms. Finding Dayton lets the task explain what the markings mean before you try to satisfy the seal. If the journal still asks for a knowledgeable person, deal with that step before treating an unchanged door as a farming problem.
Dayton identifies the structure with the Shrine of Xxarteck. The important practical point is the relationship between the shrine and your farm: the new life you cultivate counteracts the power keeping the entrance sealed. Crops and animals both belong to this explanation. There is no established universal crop count or animal count that this guide can give you for an immediate opening.
Weaken the outer seal through farming
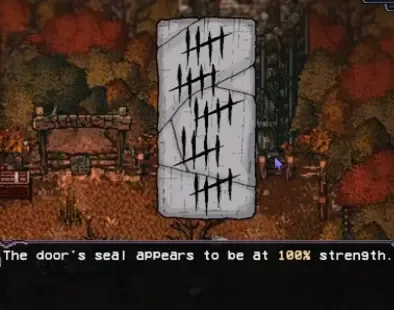
Continue growing crops and raising animals, then inspect the markings on the tower door. They are the relevant progress indicator for this stage. The available instructions do not establish an exact exchange rate between one harvest and one animal, so do not build a plan around the assumption that those actions contribute equal amounts. Likewise, buying a particular number of animals is not a documented shortcut that guarantees entry.
The change you are looking for is the markings fading away, not a larger tally appearing as a reward. Dayton explains that the entrance should open when those markings have disappeared completely. If some remain, continue cultivating the farm; if they have gone, try the entrance before leaving to buy more seeds or animals.
Use this stage to keep your farm useful for the rest of your tasks. If you already have crop requests in the journal, growing those crops advances your practical needs while you work toward the shrine. Preserve ingredients that you will need for cooking or an active request instead of selling everything as soon as it is harvested.
Animals require their own setup. If the seal is your reason for starting livestock, the cow and barn guide explains that process in detail. An animal task can take you through purchases, housing, and care; the shrine does not replace those systems with a special tower interaction. Choose livestock because you can support it on your farm, rather than because a guessed contribution number makes it appear faster than crops.
You do not need to solve the crop riddles before the exterior door has opened. Those belong to a later interior objective involving a hole for offerings. At the beginning, concentrate on Dayton's explanation, your farming progress, and the door markings. Keeping the two crop-related stages separate prevents you from searching for a specific offering when the journal is still asking you to weaken the first seal.
Read the journal as a sequence of tower stages
The Stone Tower continues well beyond its first entrance. The recorded task sequence has ten objectives, with several returns to Dayton between investigations. Those returns matter because they distinguish an unexplained discovery from the next action you are supposed to take. A newly found symbol is not automatically another demand for more farming.
| Stage | What the objective asks you to do |
|---|---|
| 1 | Find someone in town who knows about the tower. |
| 2 | Examine the markings on the Shrine of Xxarteck door. |
| 3 | Weaken the seal and open the entrance. |
| 4 | Ask Dayton about the strange markings inside. |
| 5 | Insert crops into the hole until something happens. |
| 6 | Ask Dayton about the strange writing. |
| 7 | Investigate the shrine further. |
| 8 | Ask Dayton about the giant keyhole. |
| 9 | Enter the final sealed passage. |
| 10 | Tell Dayton you have slain the Emissary of Xxarteck. |
Use the wording of your current objective to decide whether to stay inside or return to the Library. If the task says to ask Dayton about the interior markings, accumulating more offerings first can leave the actual conversation unfinished. If it asks you to investigate further, revisit the space that has opened rather than assuming the tower quest ended with the outside door. The progression repeatedly alternates discovery and interpretation.
This outline identifies the task's destination without supplying a complete final encounter strategy. In particular, the giant keyhole is a later obstacle with its own context. It should not be treated as a request to spend a Basic Skeleton Key simply because both interactions involve a lock. Follow the tower objective and Dayton's dialogue when you reach that stage.
Match the crop offering to the riddle
A later shrine section asks you to put crops into a hole. Seven offering matches have been recorded for the section described as the third floor. Match the meaning of the clue in your game before using this table; it is not a universal answer list for every offering location throughout the tower. The descriptions below summarize each clue rather than reproduce its exact wording.
| Clue meaning | Recorded crop match |
|---|---|
| Something associated with making a heart beat faster | Coffee bean |
| Something covered in a thousand tiny dots | Strawberry |
| Sadness growing in clusters | Gloom Hops |
| Something that improves with age | Grapes |
| Something normally without a face | Pumpkin |
| Many things hidden inside | Bean |
| Clouds lying on the ground | Cauliflower |
The useful pattern is the object described by the clue. Coffee connects to the faster heartbeat, while the dots describe the exterior of a strawberry. Grapes connect to improving with age, and the pumpkin clue plays on the idea of adding a face to something that normally has none. These associations can help you identify the intended entry without treating a similar-looking crop as interchangeable.
Use the named crop, not an ingredient you assume belongs to the same category. In particular, Bean and Peas are different answers. There are differing offering reports involving other sections, so check your floor and the wording if your clue does not fit the table. A mismatch is a reason to re-read the active puzzle, not a reason to substitute crops at random.
The table does not establish quantities or the cost of a wrong offering. Read the actual interaction before submitting a large stack. Keeping a small assortment of crops for this stage is a reasonable preparation choice, but there is no confirmed requirement to arrive carrying all seven at once. Your immediate need is the item corresponding to the hole or clue you are currently solving.
Unlock crops through the wider farm progression
Some tower offerings may be unfamiliar because you have not yet progressed through the farm's other tasks. Hans is important to that wider progression. His tasks connect the player with additional crop seeds and later areas, so an unavailable crop can point to an unfinished farming objective rather than an obscure shop refresh. Review Hans's task progression when the offering is clear but the crop itself is missing from your farm.
Pumpkins and coffee beans illustrate why the tower can become a long-term task. The Skull Chalice chain is associated with pumpkin seeds, while Meet Sophia leads to coffee bean seeds. These are separate tasks with their own prerequisites and return conversations. Gloom Hops seeds unlock through Hans’s Bug Catching task: take the Bug Catching Net to the Old Woods, catch a Pale Empress Moth, and deliver it to him. The moth is rare, so this can become another exploration objective while other crops grow.
Meet Sophia also reaches into the Catacombs. That means a missing offering can be connected to progress through another region, not just a decision about what to plant tomorrow. The Catacombs entrance and deeper access guide distinguishes getting into the cemetery entrance from reaching the later Sophia encounter. Follow the specific task you need instead of assuming every Catacombs gate must be opened before you can do any tower work.
Do not discard an active farming task because the Stone Tower appears more important. The larger progression is designed to draw on much of the game, and the farm tasks can provide useful access or ingredients along that path. Equally, do not turn every side activity into a mandatory tower checklist. Use a concrete missing crop, locked passage, or journal objective to identify the next dependency.
Harvesting and later doors
Farming remains relevant after the first seal. Some interior tower doors can also open as you harvest, and trembling can accompany a door opening. If you notice that kind of change while working on the farm, returning to inspect the shrine is sensible. It is not proof that one particular floor or the final passage has opened.
Check the tower itself before changing your entire farming plan. Look for an accessible passage and compare the journal with the last objective you completed. A vibration is a prompt to investigate, while the open route is the practical result you need to find. This keeps you from assuming that the outside counter explains every later obstacle in the building.
There is no reliable fixed harvest threshold to apply to all of these doors. Nor does the available progression establish that sleeping a specified number of nights will refresh a stuck tower objective. Continue the action associated with the stage, inspect the result, and speak with Dayton when the journal asks for him. Repeatedly ending the day without addressing the current instruction is not a documented tower solution.
The giant keyhole and final passage
The late tower sequence includes a giant keyhole, a final sealed passage, and the Emissary of Xxarteck. Earlier descriptions of this endgame route connect boss skulls, the Art Gallery, and a key for the final door. That provides context for why the tower expects substantial wider progression. It does not provide a complete current list of required skulls or a precise recipe for that key.
When you reach the giant keyhole, return to Dayton as the objective directs. This is a stronger next step than hunting for ordinary keys in unrelated rooms. The task has deliberately inserted a conversation here, just as it did for the earlier markings and writing. Use the information revealed at that stage to determine your next destination.
After the final confrontation, the objective list includes reporting the slain Emissary to Dayton. Do not assume defeating the encounter automatically completes every conversation attached to the task. Return to the professor and resolve the journal entry. This same distinction between an action and its turn-in appears throughout Elderfield's task chains.
Continue other regions while the tower is sealed
The Stone Tower does not have to be completed before all deeper exploration can begin. Dayton's Deeper Research chain has its own progression through the Mall basement and the Old Woods. If your current problem is access to a dark forest route, follow that research chain rather than interpreting the unfinished tower as a universal barrier. The Old Woods route guide separates initial access, club routes, and the later lantern requirement.
For the tower itself, the most reliable order remains simple: investigate the farm door, get Dayton's explanation, advance the farm, and then follow each interior objective. Treat crop riddles and later doors as individual obstacles as they appear.
Back to top