
Catch Ghost Flounder at the Lakefront with Worm bait and an Old Fishing Rod or better. Herb gives you the starter rod when you agree to try fishing, making this the first practical target in his fishing lesson. Keep the fish for the relevant task conversation before cooking or selling it.
Get Herb's fishing rod
Reach the Lakefront through the early sewer route from the park and speak to Herb. When he asks whether you are interested in fishing, accept. He provides the Old Fishing Rod and starting Worms, then asks you to show him a Ghost Flounder.
The starter rod is enough for this objective. You do not need a Sturdy or Quality Fishing Rod just to begin catching Ghost Flounder. Those later upgrades matter for other fishing areas, while this lesson is intended to teach the basic lake setup.
If the water says you need a fishing rod, check that you completed Herb's conversation and are carrying the rod. If it says no bait is equipped, use the Worm item to load it. Those two messages identify equipment setup problems before you even reach the minigame.
Load Worms and fish at the Lakefront
Select Use on Worms, then check the rod's loaded bait. Simply having Worms in your inventory does not equip them. This is especially easy to miss after using a different bait type somewhere else.
Interact with a suitable Lakefront fishing spot and wait for a bite. The nearby Radio Station waters are another location associated with the lake catch selection. For the first task, staying near Herb is a practical choice because you can return to him as soon as the target fish is caught.
| Requirement | Practical choice for the introductory task |
|---|---|
| Rod | Old Fishing Rod from Herb |
| Bait | Worm, loaded through Use |
| Location | Lakefront |
| Target | Ghost Flounder |
| Next action | Keep the fish and speak to Herb |
Older fish information lists Ghost Flounder across seasons and times, but those exact release-build boundaries have not been independently confirmed. The demonstrated starting route does not require waiting for a special weather event. If your current task or fish description adds a condition, follow that text.
Land the bite with the timing minigame
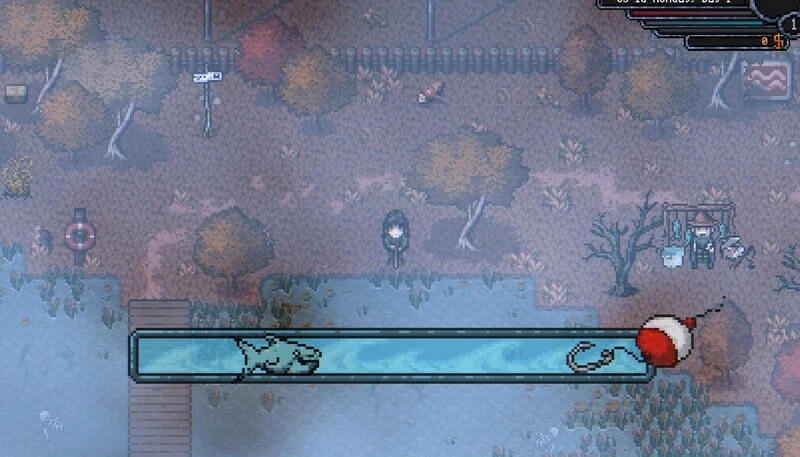
Once a fish bites, watch the moving cursor and the blue target area. Press the displayed confirm input while they line up. Each successful input advances the separate progress bar at the top until you land the catch.
Do not start by rapidly pressing before checking the alignment. Bad inputs at the beginning can drive progress to zero and end the attempt. The fishing tutorial explains this distinction between the blue timing target and the catch-progress meter in more detail.
A successful catch can still be another fish. Worms do not guarantee Ghost Flounder on every cast, and the lake has more than one possible result. If you can complete the minigame but keep catching other fish, confirm the loaded bait and allow for the catch selection rather than changing the controls.
Rain can make bites arrive sooner. It does not guarantee Ghost Flounder, a particular quality, or multiple fish. Treat faster bites as a useful opportunity for a fishing session rather than a special unlock for Herb's task.
Complete Casting Your Line
Bring the Ghost Flounder to Herb and continue his task dialogue. The introductory reward teaches Tempura, Ghost Flounder Soup, and Ghost Broth. Herb then offers a Fog Eel challenge, which introduces the use of Leeches.
One Ghost Flounder is the named target in the introductory request. Catching an extra-large result that gives more than one fish does not mean the task requires that larger number. Use the journal's item requirement rather than the quantity produced by your most recent successful cast.
An early version showed the fish remaining after it was presented to Herb. That does not establish that every task or current build always preserves the item. Complete the conversation, then inspect your inventory before planning a recipe around what remains.
If the next request names Fog Eel, change your objective accordingly. Continue at the lake with the appropriate Leech bait setup. The two lesson stages share the location and basic fishing controls, but they ask for different fish.
Keep Ghostly Catch separate
A Ghostly Catch comes from Trisha in the Abandoned Building in Town North East. She wants a Ghost Flounder for her dinner party, and the reward is a Lightning Rod blueprint. A November 2025 change set the requirement to gold quality or better; the earlier Void-only requirement no longer describes that change.
The Lightning Rod blueprint connects Trisha’s request to your farm and ranch equipment. The recorded Lightning Rod produces a Battery after a thunderstorm and can be placed on the Farm or Ranch. Receiving the blueprint and placing the finished object are separate steps, so check its construction requirements after completing the dinner-party request.
Before fishing for another batch, check the active task's title and quality requirement. A Ghost Flounder can be the correct species while still being below the quality required by a particular request. Conversely, waiting for gold quality when the introductory task does not request it can postpone a conversation you could already complete.
Fishing outcomes can include different quality grades and larger catches, with factors such as Luck, weather, and Fishing level affecting the broader system. There is no confirmed recipe for forcing a gold-quality Ghost Flounder on the next cast. Keep the task's requirement visible and count only the fish that actually qualify.
If a task does not accept the fish, compare its complete name and grade with the requested item. A similarly themed fish, a substitute cooking ingredient, and a normal-quality Ghost Flounder are different possibilities. That item-level check is more useful than assuming that all ghost-related fish should work.
Use the fish in cooking
Ghost Flounder is a cooking ingredient, and Herb's lesson introduces recipes that put the catch to work. Learning a recipe and owning the fish are separate prerequisites. Open the relevant cooking station after the task reward and inspect the complete ingredient list.
Ghost Flounder Soup and Ghost Broth are distinct recipes even though they share the ghost theme. Fog Broth belongs to the Fog Eel part of the lesson. Read the dish's exact name when another character requests food, because the words “ghost” and “fog” are easy to confuse while moving between the task log and cooking menu.
Later fish recipes also use Ghost Flounder. Ghost Sashimi combines Ghost Flounder and Secret Sauce, while Sushi includes it alongside other ingredients. If sauce is blocking a recipe you have learned, use the Secret Sauce guide to follow the Eyeleaf and Grinder route.
Plan the fish count for a cooking batch
The recorded cooking recipes use different numbers of Ghost Flounder. Tempura needs one, while the soup and several later dishes need two, and Ghost Broth needs three. Compare the following reference with your current recipe screen before committing a task fish to a batch.
| Dish | Recorded ingredients | Recipe access |
|---|---|---|
| Tempura | 1 Ghost Flounder and 1 Bread | Taught through Herb's first fish lesson |
| Ghost Flounder Soup | 2 Ghost Flounder and 2 Bitter Herb | Taught through Herb's first fish lesson |
| Ghost Broth | 3 Ghost Flounder and 1 Radish | Taught through Herb's first fish lesson |
| Ghost Sashimi | 2 Ghost Flounder and 2 Secret Sauce | A later learned recipe |
| Sushi | 1 Stalktopus, 2 Ghost Flounder, 4 Bitter Herb, and 1 Secret Sauce | A later learned recipe |
If you return from Herb with one usable fish and have Bread, the recorded Tempura recipe fits that small supply. Two fish alone are still not enough for Ghost Flounder Soup without the Bitter Herbs. Three fish and a Radish match the Ghost Broth recipe, so the ingredient you grow or gather should follow the dish you actually intend to make.
For example, using these recorded quantities, two servings of Ghost Flounder Soup need four Ghost Flounders and four Bitter Herbs. That is a recipe calculation, not a promise that four casts will produce four fish. Calculate from the inventory after fishing, and compare the current cooking screen before making several servings.
The later dishes introduce different supply constraints. Ghost Sashimi needs sauce production or an acquired sauce supply, while Sushi adds a Mall catch and more herbs. Those ingredients make a mixed cooking plan different from simply catching more Ghost Flounder at the same spot.
Compare sale grades before using the stack
The earlier fish reference lists Ghost Flounder selling values of 10, 13, 16, and 20 gold across its ascending quality grades. These are individual selling values from that reference, not a guaranteed return per cast. Check the value displayed for the fish in your current inventory before making a sale.
| Recorded quality grade | Recorded selling value |
|---|---|
| Normal | 10 gold |
| Silver | 13 gold |
| Gold | 16 gold |
| Void | 20 gold |
A high-grade fish can have a task use beyond its additional sale value. If Ghostly Catch is active and asks for gold quality or better, set an eligible fish aside first. You can then decide what to do with the rest without trading away the specific grade that would have finished the request.
There is no universal best choice between selling and cooking here. A meal may be useful when you need its effect, a fish may be required by a task, and spare stock may simply be available to sell. Make the choice from the current recipe, request, and inventory rather than treating the species' base value as its only purpose.
Cooking substitutes do not replace task fish
Lake Screamer and Corpsefish can serve as Ghost Flounder substitutes in crafting or cooking contexts. That substitution belongs to recipes that allow it. It does not mean a character requesting a Ghost Flounder accepts any fish with a similar description.
Check the cooking menu to see whether an alternative ingredient is accepted for the specific dish. If it is, using that alternative may let you reserve a Ghost Flounder for a task. This is a useful choice when you already own both kinds of fish, without requiring you to establish a new fishing route.
The substitute species can have their own season and time conditions, and older catch information differs on some of those details. Do not abandon the straightforward Worm-and-Lakefront route just because a recipe mentions an alternative. Use a substitute when it is available and accepted, rather than assuming it is easier to obtain.
Replenish Worms without changing the target
If you run out of Worms, inspect any stored bait before leaving for a new supply trip. General Store Bait Packs can provide Worms, but their contents are random. A pack can also give other bait, so it is not a guaranteed fixed-size Worm purchase.
Wormsprout is the crop that supplies Worm bait. It is useful for later fishing sessions when you have time to grow a supply. The precise release-build growth period and harvest quantity are not confirmed, so plan around the Worms actually harvested rather than a promised number of casts from each seed.
Keep Leeches and Bugs from random packs for their own uses. Leeches help with the next Fog Eel stage, while Bugs are used at the Mall. They are useful supplies even when today's objective still calls for Worms and Ghost Flounder.
Diagnose an unsuccessful search
If you cannot cast, check the rod, loaded bait, and the fishing spot. If the minigame starts but ends quickly, slow down and watch the blue alignment before pressing. If you land other fish, verify the target's bait and conditions while recognizing that the catch is random.
Older builds also had a specialized bait issue addressed by the September 2026 demo updates. A current installation and an older demo can therefore behave differently. Checking the version is useful when the intended setup seems inconsistent, but an unlucky stretch alone does not prove that the bug is present.
Leave inventory room for the catch and visit the task giver as soon as you have the needed species and quality. For the introductory lesson, the route is compact: accept Herb's equipment, load Worms, fish at the lake, and show him the Ghost Flounder. After that, decide whether the remaining fish belongs in a recipe, a later task, or your selling inventory.
Back to top